How to scan a document to PDF on iPhone
Updated
To scan a document on iPhone, open Notes, tap the Attachments button in a note, then tap Scan Documents and hold your iPhone over the page. It captures the page on its own when it finds the edges, and when you tap Done the pages are saved as a PDF in the note. The Files and Preview apps have the same scanner and save the PDF as a file instead.
iOS steps below were checked against Apple’s iPhone User Guide for iOS 26 and iOS 27 and Apple Support’s scanning article.
Which built-in app to use
All three apps use the same camera scanner. The difference is where your PDF ends up:
- Notes keeps the scan inside a note, next to anything else you write there.
- Files saves the scan as a PDF in a folder you choose.
- Preview creates a PDF you can keep working on: add, delete, rotate or crop pages.
If you’re going to email or upload the PDF, Files or Preview saves you a step.
Scan a document in Notes
- Open Notes and open a note, or create a new one.
- Tap the Attachments button, then tap Scan Documents.
- Hold your iPhone so the page fills the screen. Set Flash or Filters if you need them.
- Keep your iPhone steady. It captures the page when it detects the page boundaries.
- Scan the next page, and so on. Tap the Done button when you’re finished.
The pages are saved as one PDF in the note. To get it out, tap the Menu button on the PDF in the note and choose an action to copy, share or rename it.
Prefer to capture each page yourself? Turn off automatic capture, then tap the Take Picture button. Drag the corners to fit the page, then keep the scan or retake it.
Fix a page later. With the PDF shown at medium or large size in the note, tap a page thumbnail, tap the More button, and choose Rotate Left, Rotate Right, Filters or Crop Page.
Scan a document in Files
- Open Files and tap the More button.
- Tap Scan Documents.
- Hold your iPhone over the page. It scans automatically in Auto mode, or tap the Shutter button to capture it yourself.
- Drag the corners to fit the page if needed, then keep the scan.
- Scan more pages or tap the Done button.
- Choose a location, then tap Save.
The PDF is now in that folder, ready to attach or upload.
Scan a document in Preview
- Open Preview and tap Scan Documents.
- Hold your iPhone so the page appears on the screen. It captures the page automatically.
- Repeat for each page.
- Tap the thumbnails to crop, rotate, or adjust the coloring of a page.
- Tap the Done button.
To capture pages yourself, tap Auto so the label changes to Manual, then tap the Shutter button.
Tips for a clean, readable scan
The scanner straightens and crops the page for you, but it can only work with what the camera sees.
- Use a dark, plain background. A white page on a dark table gives the scanner clear edges to find.
- Light it evenly. Watch for your own shadow, or your phone’s, falling across the page.
- Hold the phone flat above the page. The scanner corrects some tilt, but text stays sharper from straight above.
- Flatten the page. Unfold creases and hold down curled corners.
- Use flash with care. It helps in a dark room, but can leave glare on glossy paper.
- Wipe the lens. A smudged lens makes the whole scan look soft.
- Check each page before you finish. Zoom in on small print and numbers. Rescanning now is easier than finding out later.
Filters change how a page looks, not how much detail the camera caught. If a page is hard to read, scan it again.
When you need to sign the scanned pages
Often a lease, consent form or contract has to come back signed. Notes can do a simple version of this. Tap the scanned document in the note, tap the Markup button, tap the Add button, then tap Signature to add a saved signature or create one, and place it on the page.
eSign Documents is built for this whole round trip. It has its own document scanner, so you can scan the pages and sign them in one place:
- Edge detection and perspective correction. Edges are found and the page is straightened.
- Several pages in a row. Scan one page or many, then reorder or delete pages.
- Your real signature. Draw it with your finger, or scan the one you wrote on paper: it’s detected, cropped and its background removed. Keep several signatures and reuse them.
- Place and adjust. Put a signature on any page, then move, resize or rotate it.
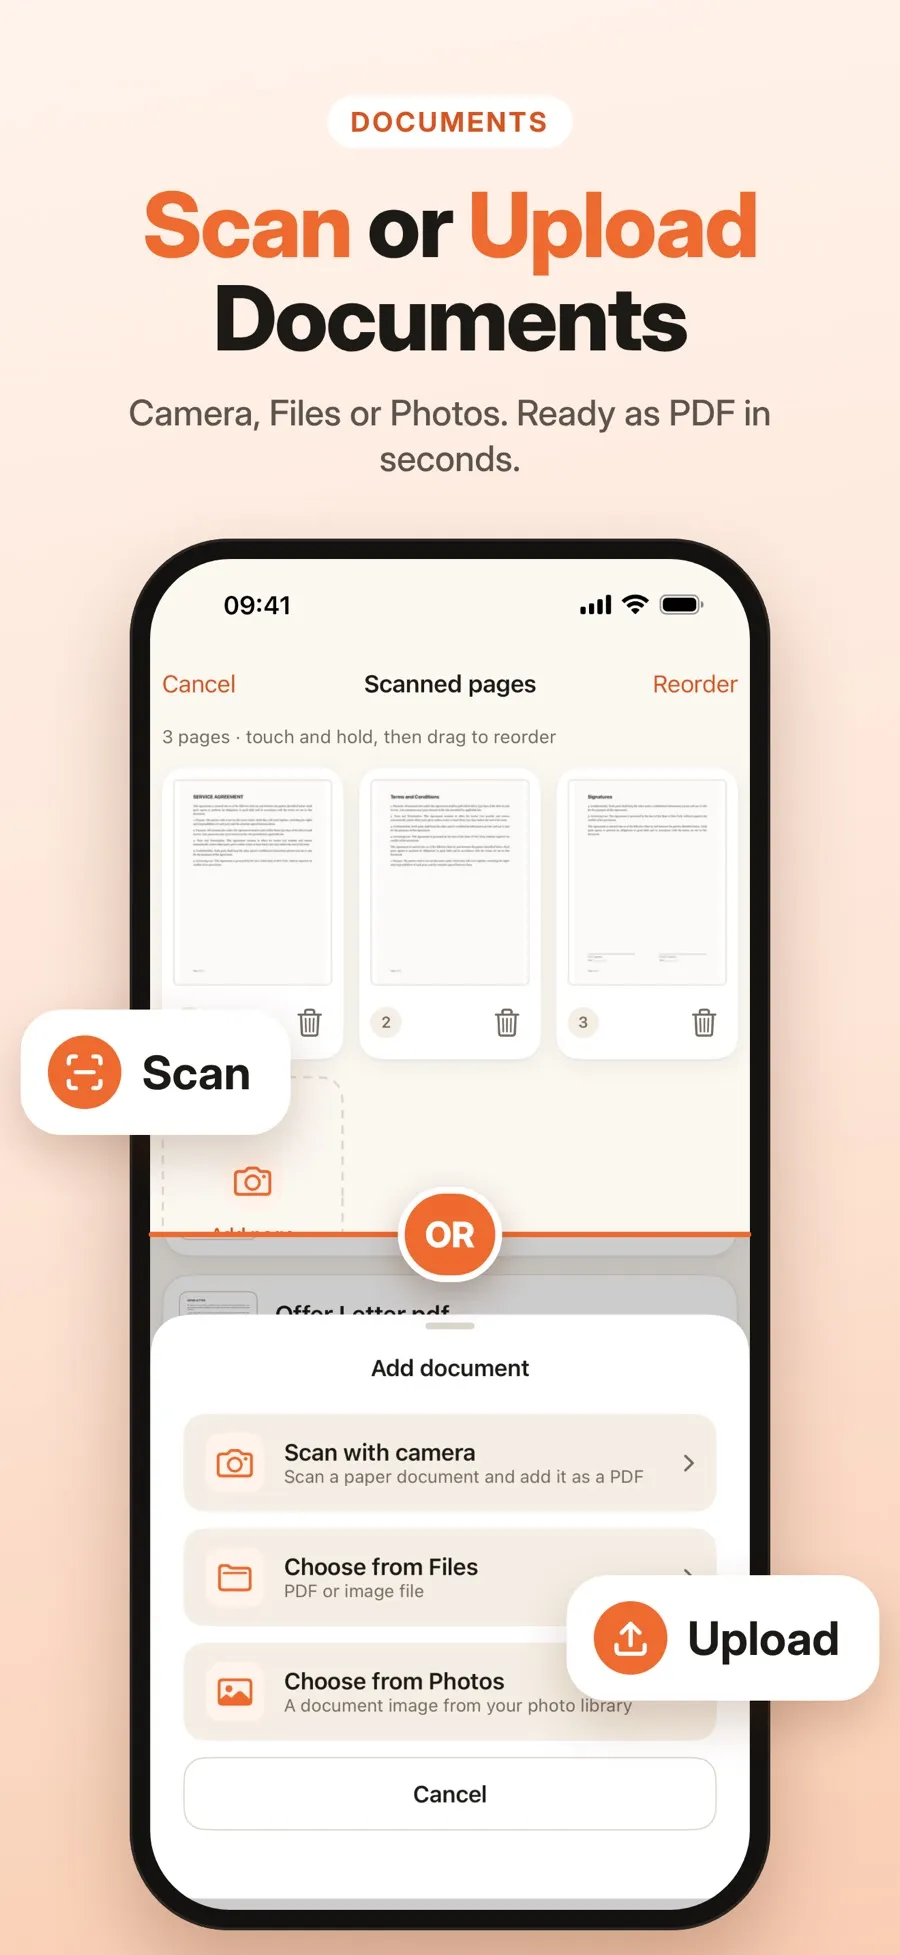
- Open eSign Documents and make your signature: draw it, or scan it from paper.
- Add a document by scanning the pages with the camera. You can also open a PDF from Files or pick photos.
- Reorder or delete pages if needed.
- Place your signature on the page, then move, resize or rotate it.
- Save a draft to finish later, or create a signed copy.
The signed copy is a new file; the original stays as it was. Documents are stored on your device, with no account. Drawing, scanning and signing are free. Sharing a signed PDF or saving it to Files is part of Premium, a weekly or yearly subscription.
The app places an image of your handwritten signature, not a certificate-based digital signature. Whether that’s accepted depends on the document and the country, so if you’re not sure, ask whoever sent it.
Quick answers
Does iPhone have a built-in document scanner?
Yes. Notes, Files and Preview all include Scan Documents. They capture pages automatically when they detect the edges and save the result as a PDF.
Where do scanned documents go on iPhone?
It depends on the app. Notes keeps the PDF inside the note, Files saves it to the folder you choose, and Preview creates a PDF you can save and keep editing.
Can I scan several pages into one PDF?
Yes. Keep scanning pages before you tap Done, and they’re combined into one PDF.
Why is my scan blurry or cut off?
Usually it’s low light, a tilted phone or a background close to the paper’s color. Use a darker surface and even light, hold the phone flat above the page, and adjust the corners if edges were missed.
